I Believe This Might Just Be My Masterpiece: Birthday Cake 2014

Brown Butter & Lime Cake, with Strawberry Jam, Cornflake Crunch, and Corn Buttercream

Who makes the best cakes?  Momofuku Milk Bar makes the best cakes.  I am not being paid or otherwise compensated to say this.  It’s just the damn truth.

Here’s the logic: the best food texture is, obviously, crunchy.  Obviously.

What makes a good salad better?  Crunchy croutons (or crunchy bits of bacon).

Want your mac and cheese to go to 11?  Put a parmesan-breadcrumb topping on it.  Crunchy.

Best fried eggs ever?  Fry them on some panko.  You have unlocked achievement: crunchy.

What do you put on yogurt?  Granola.  Because crunchy.

What is lacking in 99.999% of cakes?  You daaamn right: crunchy.

pretty cake

I’m not a bakery connoisseur, but as far as I know, Christina Tosi is the only baker out there putting substantial crunchy in her cakes.  I’m talking serious crunch here.  Buckets of crunch.  Toasted nuts do not count, they are weak.  Other than the occasional dacquoise, which involves layers of dried meringue (and who makes those?), I’m not really aware of any.  Am I missing anything?

Crunchy layers will take a good cake to a friggin’ amazing cake.  Since I got my grubby hands on the Milk Bar cookbook, I haven’t made a layer cake without some sort of crunchy “crumb” layer.  You can never go back.

This year for my birthday, in imitation of Tosi, I made myself a Brown Butter & Lime Cake, with Strawberry Jam, Cornflake Crunch, and Corn Buttercream.

And hoo boy.

Hooooooo boy.

This cake… this cake was special.  It did not last long.

This is my new favorite cake trick: flavored buttercream.  And it’s stupid easy!  Figure out what flavor you want.  Buy some freeze dried whatever-that-flavor-is.  Me, I used corn.  Grind some to a fine powder in a spice/coffee grinder, and add it to your favorite buttercream.  Wham!  Corn Buttercream.

You’re welcome.

Brown Butter & Lime Cake, with Strawberry Jam, Cornflake Crunch, and Corn Buttercream

Yield: 1 friggin amazing cake

Brown Butter & Lime Cake, with Strawberry Jam, Cornflake Crunch, and Corn Buttercream

All right, let's do this thing.

The cake was Rose Levy Beranbaum's French Génoise. I made the Rich Variant, doubled the recipe to make 2 cakes, and rubbed the zest of 1 lime into the sugar until it looked like wet sand and smelled incredible. In the syrup, I used Bourbon.

For the strawberry jam, I sliced up a shy quart of farmers market strawberries, put 'em in a pan with a sprinkling of sugar (maybe a couple of tablespoons), and a hefty squeeze of lemon. I measured nothing. It cooked on medium-low until thick and jammy, which took it at least 30 minutes, probably more. And buddy, it was intense.

The cornflake crunch was based on Chef Tosi's Corn Crumbs, but I swapped cornflakes for the indicated Cap'n Crunch.  It didn't really work as expected.  It needed waaay more white chocolate at the end to make it come together.  It did the job, though.

The buttercream was based on the same recipe as this one, sans rum. I made only a half recipe this time, and it was the perfect amount for a 10" four-layer cake. I added 60 grams of finely ground freeze-dried corn to the finished buttercream.

Ingredients

  • (links to recipes in the headnotes)
  • Brown Butter and Lime Cake
  • Bourbon Syrup
  • Strawberry Jam
  • Cornflake Crunch
  • Corn Buttercream

Instructions

1. Slice the cakes in half horizontally, and trim any domed tops until things are nice and flat. Place the bottom of one cake on a cake plate or serving platter. (Reserve the other bottom for the top of the cake.) Slide four strips of wax paper under each side of the cake to protect the platter from over-frosting.

2. Brush the cake with the Bourbon Syrup until well-moistened.

3. Spread one third of the Strawberry Jam in a thin layer all the way to the edge.

4. Crumble an even layer of Cornflake Crunch over the jam, and press until mostly even.

5. Spread a dollop of Corn Buttercream evenly over the top of the Crunch layer, as evenly as possible.

6. Place another layer of cake on top of the frosting, and gently press into place.

7. Repeat the layering process. Brush the cut side of the last cake layer with syrup before stacking it syrup-side-down onto the cake.

8. Place a very large dollop of frosting on the top of the cake. Smooth it across the top and down the sides of the cake in a thin, even layer. Don't worry about crumbs at this point, just make it look even. This is called a "crumb coat". Use additional frosting as needed, but make this coat a thin one. Don't get crumbs in the bowl of remaining frosting.

9. Once the crumb coat is finished, chill the cake and any unused frosting for at least 1 hour.

10. When the crumb coat is firm and well chilled, repeat the frosting procedure with the remaining frosting. No crumbs should be showing.

11. Decorate however you want to, with piped frosting, leftover Cornflake Crunch, or whatever.

12. Chill the cake at least 1 hour, or until frosting is firm and well chilled. Now remove the wax paper from under the cake. Admire how clean your platter looks.

13. Serve at a party with candles and friends to sing "Happy Birthday". Champagne, Bourbon, you know the drill.

https://onehundredeggs.com/i-believe-this-might-just-be-my-masterpiece-birthday-cake-2014/

Foie Gras au Torchon: Actually Not That Hard

foie gras au torchon

Real talk.

Until about a month ago, my experience in the kitchen has had a gap.  Not a huge gap, or one that had ever come up until earlier this year.  Most of my clients would never know, but I was exposed.  And I’m not one to let a chance for self-improvement slip away.

I’d never actually prepared foie gras before.  I’d had no exposure to it whatsoever, aside from on the end of a fork.  Turns out Baking and Pastry students don’t get much training in offal.

foie gras au torchon

Clearly, my career demanded an attempt.  So the next time I was at the restaurant supply store, I picked up one of the football-sized livers.  I got the smallest one, and it was still a pound and a half.

After seeing Michael Ruhlman’s expert and extremely-detailed method, I decided to make my first attempt a foie gras au torchon.  This translates to “fat liver inna towel”.  Mmmm.

foie gras au torchon
hanging in the fridge

Once you devein the liver — which is somehow easier and harder than it sounds — it’s just soak, wrap, poach, wrap, hang, slice, nom.  Easy peasy.  No searing, no smoke, no “oh my god I just burned and/or melted fifty dollars worth of foie gras”.

Which is nice.

I served this very simply, with just a sprinkle of fleur de sel, and tiny pools of balsamic vinegar.  Bread, of course.  Halfway through eating it, I remembered the Boat Street Pickled Figs in the fridge, and oh my god you should always serve foie gras with figs.  That, or the Mango Butter from Trader Joe’s.

foie gras au torchon

Oh, and yes I know one is supposed to trim away the dark edges and make things all perfectly round and pristine.  But let’s be honest, I was going to eat the scraps anyway.  I figured I’d do it with class, instead of licking them off the round cutter.

Foie Gras au Torchon

Seriously, if you feel confident in a kitchen, you can do this with no problem. Yes, it's harder than making toast. Yes, it's expensive. Yes, it takes several days. But you will be rewarded with so much freakin' foie gras au torchon you might have to give it away.

FYI: I made this at what ended up being a very busy time. So my foie ended up marinating in the fridge for 5 to 6 days before I ever got around to poaching it. It was still lovely.

Ingredients

https://onehundredeggs.com/foie-gras-au-torchon-actually-not-that-hard/

Birthday Cake: Anise and Pineapple (and Crème Fraîche and Maple and Walnuts Too)


birthday cake

This is overdue, but who cares?  Cake is cake.

I made a birthday cake late last year, for my lovely sous-chef, editor, and boyfriend.  (One of those roles came before the other two, not vice versa.  I’m not that kind of girl.)

I demand inspiration each year for this cake.  You may remember last year’s version, or the one before.  And lest we forget, the first year I handed him the challenge, his reply was for a cake that “most people wouldn’t want to even try, based solely on the description”.

This year, the request was for something anise.  Or pineapple.  Whichever.

Of course, I had to do both.  What’s life about without a good challenge now and again?

Anise Spice Cake with Crème Fraîche Frosting, Pineapple Jam, and Maple Walnuts

In the end, I gave him an Anise Spice Cake with Pineapple Jam, Crème Fraîche Frosting, and Maple Coated Walnuts.  And if I’m brutally honest (I am), I wish I had been more bold with the anise, and used a heavier hand with the pineapple.  Neither flavor came through particularly strong, though the cake was a very good one overall.

It’s not too rich.  The crème fraîche puts the frosting firmly on the tangy side of sweet, without being too sour.  The cake is very moist, and the pineapple jam helps it stay that way over time.  The crunch from the maple walnuts is just delightful.

Also, be sure to let the cake chill thoroughly before slicing it.  Take it from one who knows.

Anise Spice Cake with Crème Fraîche Frosting, Pineapple Jam, and Maple Walnuts
chill that cake or this’ll happen to you

Anise Spice Cake with Crème Fraîche Frosting, Pineapple Jam, and Maple Walnuts

Yield: 1 gorgeous cake

Anise Spice Cake with Crème Fraîche Frosting, Pineapple Jam, and Maple Walnuts

The jam is adapted from this recipe. The cake and frosting are adapted from this recipe. I baked this in a half sheet pan, though round cake pans will work just as well. They will bake more quickly, though.

Measurements are given in grams, because I take great pleasure in precision baking. I honestly don't understand how anyone bakes without using a scale. The frosting, on the other hand, can handle a lot of variance, so the measurements are a little looser. Wing that one. Have fun.

Ingredients

    For the Pineapple Jam:
  • 1 medium pineapple, chopped into 1 inch pieces
  • 2 d'Anjou pears, chopped very finely (or peeled and chopped into 1 inch pieces)
  • 210 grams (7 1/2 ounces, or 1 cup) sugar
  • Zest and juice from from 2-3 lemons (enough to make about 1/3 cup fresh lemon juice)
  • 1 tablespoon rum
  • For the Maple Coated Walnuts:
  • 125 grams (about 1 cup) walnuts
  • 100 grams (about 1/3 cup) maple syrup
  • Kosher salt, to taste
  • For the Anise Spice Cake:
  • 300 grams (2 1/2 cups) all purpose flour
  • 2 teaspoons ground aniseed
  • 1/2 teaspoon ground Chinese five-spice
  • 1/2 teaspoon ground ginger
  • 1 teaspoon baking soda
  • 1/2 teaspoon coarse kosher salt
  • 50 grams (1/3 cup) finely chopped crystallized ginger
  • 170 grams (3/4 cup, or 1 1/2 sticks) unsalted butter, at room temperature, plus a little extra for coating the cake pans
  • 200 grams (1 cup) dark brown sugar
  • 2 large eggs, preferably at room temperature
  • 170 grams (3/4 cup) hot water (not boiling)
  • 190 grams (2/3 cup) maple syrup
  • For the Crème Fraîche Frosting:
  • 2 teaspoons unflavored gelatine (optional)
  • 2 tablespoons cold water (optional)
  • 2 cups crème fraîche
  • 2 cups heavy whipping cream
  • 6 tablespoons powdered sugar
  • 1 tablespoon maple syrup
  • 1 tablespoon rum

Instructions

To make the Pineapple Jam:

1. Chop the pineapple and pear, and combine in a medium pan with the sugar and lemon juice.

2. Simmer over medium-low heat until fruit is tender, about 10 minutes.

3. Reduce heat to low. Stirring occasionally, simmer an additional 30 to 60 minutes, or until thick. Do not let scorch. Jam will continue to thicken as it cools. Can be made several days in advance.

To make the Maple Coated Walnuts:

1. Preheat oven to 350° F.

2. Toast walnuts on a sheet pan for 7 to 10 minutes, or until fragrant but not overly browned. Let cool. Lay out a piece of aluminum foil on a heat-proof surface.

3. Place nuts in a nonstick skillet over medium-high heat. Drizzle maple syrup over walnuts, and stir to coat. Bring to a boil, stirring constantly. Cook until syrup is thick and dark, about 3 minutes.

4. Turn nuts out onto the foil, and sprinkle with a large pinch of Kosher salt. Let cool at least 1 hour.

5. Chop coated nuts finely, either by hand or by pulsing in a food processor. Can be made several days in advance.

To make the Cake:

1. Preheat the oven to 350° F. Lightly coat a rimmed baking sheet (13x18x1 inch) with cool or room-temperature butter, then dust with flour. Knock any excess flour out of the pan. Line the bottom of the pan with parchment paper.

2. Whisk together the flour, spices, baking soda, salt, and ginger. Set aside.

3. Combine the butter and brown sugar in the bowl of a stand mixer. Using the paddle attachment, cream together on medium speed until fluffy, 3 to 5 minutes, scraping the bowl once or twice to combine thoroughly.

4. Add the eggs one at a time, beating on low to combine after each addition, scraping the bowl as needed.

5. Stir the hot water and maple syrup together. Add the dry ingredients to the butter-sugar mixture in the stand mixer in 4 separate additions, alternating with 3 separate additions of the maple syrup and water. Beat on low speed to combine after each addition, scraping the bowl as needed to incorporate evenly. Do not overmix; just beat until no large pockets of flour are left.

6. Pour the batter into the prepared pan, and smooth the top evenly. Bake at 350° F for 30 to 40 minutes, or until done. Let cake cool in pan.

To make the Frosting:

1. Sprinkle the gelatine evenly over the surface of the cold water in a small, microwave-safe bowl. Let stand 5 to 10 minutes, or until evenly moistened and bloomed. This step, though optional, will help maintain the integrity of your frosting and keep it from weeping over time.

2. Microwave the bowl of gelatine for about 30 seconds, or until dissolved.

3. Combine the crème fraîche and cream in the bowl of a stand mixer. Using the whisk attachment, whip on medium-high while gradually adding the powdered sugar. Do not beat past soft peaks.

4. Drizzle in the gelatine, maple syrup, and rum while whisking at low speed. You may need to whisk or fold these in by hand. If the cream starts to look a little lumpy and over-whipped, whisk in some additional heavy cream to smooth it out.

To assemble the cake (see photos below):

1. Using a serrated knife, cut the edges of the cake off (just like cutting the crust off a sandwich). Cut the cake into four equal-sized pieces.

2. Spread one piece with a thin layer of the Pineapple Jam, and place on desired cake plate or serving platter. Slide four strips of wax paper under each side of the cake to protect the platter from over-frosting.

3. Spread a dollop of frosting evenly over the top of the Pineapple Jam layer.

4. Repeat the layering process, spreading a cake layer with jam before stacking it onto the cake and spreading frosting over the top of the jam. Do not spread jam onto the last cake layer; just stack it on top of the other layers.

5. Place a very large dollop of frosting on the top of the cake. Smooth it across the top and down the sides of the cake in a thin, even layer. Do not worry about crumbs at this point, just make it look even. This is called a "crumb coat". Use additional frosting as needed, but make this coat a thin one.

6. Once the crumb coat is finished, chill the cake and any unused frosting for at least 1 hour.

7. When the crumb coat is firm and well chilled, repeat the frosting procedure with the remaining frosting. No crumbs should be showing.

8. Press the chopped Maple Coated Walnuts into the sides of the cake.

9. Chill the cake at least 1 hour, or until frosting is firm and well chilled. Now remove the wax paper from under the cake.

10. Serve with candles and merriment and friends to sing "Happy Birthday". A spot of Champagne or Bourbon is not unwelcome here.

https://onehundredeggs.com/birthday-cake-anise-and-pineapple-and-creme-fraiche-and-maple-and-walnuts-too/

Step by step photos for cake frosting:

cake cake cake
perfectly smooth cake
cut cut cut
cut into four equal pieces
jam jam jam
thin layer of jam
dollop
small dollop between layers
squish squish squish
the stack
so much frosting
lots of frosting on top for the crumb coat
second coat of frosting.  this cake would fail in culinary school, please don’t show this to my former teachers.
cake!
finished!  masking the sides with nuts fixes all ills.

Thanksgiving: Before, During, and After

Ah, Thanksgiving.  How was yours?  Mine was super-relaxing.

research

Want to know what a Personal Chef eats on the day before Thanksgiving?  And for lunch the day of?

The same thing everyone else eats: whatever is most convenient.

true story

And when it’s a pescatarian Thanksgiving meal that one doesn’t start planning until Tuesday (luckily for only three people), it’s a meal full of nothing but simple “greatest hits” that one can basically bang out with eyes closed.

Or blurry eyes, if you’ve already gotten into the bar.  And it’s Thanksgiving, so of course you have.

Clockwise, from the fish in front (and with links to recipes):
Crème Fraîche Roasted Salmon

Raw Lacinato Kale and Brussels Sprouts Salad (one of my all-time favorite recipes)
Mirliton and Shrimp Dressing
Roasted Delicata Squash with Avocado Sauce and Walnuts

Dessert was a Lemon Curd Tart with a Gingerbread Rusk crust, adapted from the Momofuku Milk Bar cookbook.  It was my one concession to the overachiever that lives in my heart.

To deal with some leftovers, I cooked up a couple of bacon slices, sautéed a bit of leftover kale and Brussels sprouts in the fat, and tossed it all with some cooked orzo and a healthy dash of hot sauce.  Beer.  Salad.  Lovely.

The day after Thanksgiving is the day I do not leave the house.  Man, forget that.  Instead, I put on Christmas music (this year’s selection), whip up some eggnog, and put up the tree.  It is absolutely my favorite holiday.  This year, I even made cookies.

so sparkle

The eggnog this year is the aged eggnog recipe from the Art of Eating, and you guys it. is. amazing.  Previously, I’ve used the uncooked eggnog from the Joy of Cooking, but always end up with a huge pitcher of eggnog that I end up dreading towards the end, but slogging through bravely.  I mean, one can only drink so much nog before it begins to wear a person down.

This recipe, though, has you mix an egg-booze-sugar base that gets aged at least three weeks (!), and mixed up one cocktail at a time.  It’s perfect.  Bonus: aging the eggs in booze actually kills all traces of salmonella, so it’s safer than my old traditional uncooked eggnog.  We do not discuss cooked eggnog around here.

If you have a copy of the magazine, I strongly urge you to mix up a batch.  It’ll be ready just in time for Christmas.

nog perfection
tinsel tree for maximum sparkles

Hope you had a lovely holiday weekend.  Now let’s get ready for the next one.

New Year’s Eve Dinner

Some scenes from my wild New Year’s Eve, pleasantly spent at home in the company of a slightly under-the-weather boyfriend.  I lit candles, and put on a dress and heels, because it just isn’t New Year’s without some fancy-pants luxury.  He put on a suit, bless’im.

First, a Sazerac…

…which went nicely with the requisite black-eyed peas and cabbage (for luck and money, respectively).

like a good southern girl

Breaking with tradition, I made corn-buttermilk popovers instead of cornbread to posh things up a little.  These didn’t quite pop over perfectly, but they tasted good all the same.

We watched a movie, and shook up another cocktail to toast with at midnight.  After some Auld Lang Syne, it was video games until bedtime.

No cabs.  No crowds.  No hangover.  Simple.  Easy.  Perfect.  Exactly the right start.

Happy New Year.

The Birthday Cake

In case anyone was wondering – and you were all wondering, right? – this is the birthday cake I made for my boyfriend this year.

It’s a tradition that I ask him every year what kind of cake he wants, and in return he gives me not a flavor, but a fairly broad category that I can have fun with.  These have included “fruit”, “cookie”, and “something that most people wouldn’t even want to try based solely on the description”.  Good times.

This year, the challenge was “super spice cake”.  So I made a super-gingery ginger cake with spiced poached pears, and lemon ice cream for a clean counterpoint.

Recipes for the ginger cake and poached pears are both from David Lebovitz‘s Ready For Dessert, one of the smartest cookbook investments I’ve ever made.  Every. Single. Recipe. is flawless, and turns out exactly as described.

The ginger cake (recipe can be found here) has so much ginger in it, you’ll think it’s a typo.  But have faith, because you’ll be rewarded with an incredibly moist cake that’s bursting at the seams with fresh, clean, super ginger flavor.  Did I mention moist?  This cake, cut and covered loosely with plastic wrap at room temperature, did not dry out even a little bit.  Not even the cut edges.  Not even after a week or more.  Absolument incroyable.

The pears, lightly spiced, were a delightful addition, and in any other setting would be stars in their own right.  But here they were clearly in a supporting role.  A similar recipe to the one I used can be found here, on Mr. Lebovitz’s blog.

But the lemon ice cream… oh!, the lemon ice cream.  The recipe (which you can find here) is from Jeni’s Splendid Ice Creams at Home, by Jeni Britton Bauer.  And people, if you have an ice cream maker, and you don’t have this book, you’re cheating yourself.  It’s not just a gorgeous book to look at, the recipes are inventive and result in textbook-perfect texture for your homemade ice creams, sorbets, and ices.  Listen to this woman, she knows exactly what she’s doing with ice cream.  I might not ever use anyone else’s ice cream recipes.

This lemon ice cream strikes the elusive ideal balance between tart, sweet, and creamy.  Even better, the headnote of the recipe said she developed it to pair with an intense and dark ginger cake.  I was practically forced to make it.  The result couldn’t have been better.  I’m intending to use up part of the remaining ice cream in ginger cookie ice cream sandwiches, it went together so well.

Again, recipes:
Ginger Cake
Poached Pears
Lemon Ice Cream

happy birthday indeed

Thanksgiving; Or, Better Late than Never

We had Thanksgiving dinner!  You know, um, two weeks ago.   (Give or take a day.)  I bet you did, too.

I took some pictures, and thought you might like to see them.

For hors d’oeuvres, we had a date and kumquat chutney…

…served with a round of soft Camembert, the World’s Best Spiced Pretzel-Nut mixture, and the World’s Best Spiced Peanuts.  Black pepper water crackers are always a must.

There was also a cocktail hour, featuring a rye and amaro concoction that required a few attempts at mixing and sampling to perfect, simple as the recipe seems.  I think it was four tries before we hit the real magic.  Perseverance always pays off.

The entrée was a couple of wild pheasants, barded with bacon and braised whole with aromatics, juniper, and bay.  They were hunted by a friend of a friend (thank you, Sergei!), and were pretty fabulous, if I do say so myself.  On the same platter are roasted wedges of acorn squash.  To the right of the pheasant is a sweet corn spoonbread, which might’ve risen higher if I had a proper soufflé dish, but I don’t need to keep one around for how often I make soufflés (this might be the second or third time in this apartment).

This is cornbread, chestnut, and andouille dressing.  I think dressing is my favorite part of the typical All-American Thanksgiving Dinner.  Basically just bread and vegetables, maybe a little meat for flavor, what else do you need?

I don’t know about you, but I think this dish is hilarious.  It’s my nod to that perennial favorite, jellied cranberry sauce in a can.  Thanksgiving dinner was never complete without it when I was little, and it turns out it was always my boyfriend’s favorite part, too.  It was stupidly simple; I just made a fancy cranberry sauce (half recipe of that beast) and molded it in a can.  But the solids that I was supposed to trash – instead I strained and jazzed them up with a little port and some orange zest – have been my favorite leftover.  Sandwiches, curries, cheese on crackers, they all go splendidly.

For bread, I made these mustard rolls, because Thanksgiving requires a softer-crust roll.  Ciabatta or a baguette just doesn’t seem right.

Dessert was a Paris-Brest, from a Cook’s Illustrated recipe.  I usually trust CI with my life, but I feel they really dropped the ball with this one (or maybe I did).  It looked pretty enough, but there were issues.  The choux paste was fine, but it didn’t behave like my usual recipe.  The hazelnut crème chiboust filling was a little too stiff with gelatin, and didn’t melt on the tongue like you’d expect it to.  It was just okay, and I was sorry to have wasted the poor hazelnuts on it.  Yes, I’m very picky about the desserts I make.

pretty, though

On this plate, you can see the raw kale and brussels sprout salad I included for a little verdant crunch among the other rich dishes.  This salad is so, so, so good.  It’s earned a place in my short go-to list.  Full-flavored, crunchy, and ridiculously nutritious.  I could eat it every day.

For you oenophiles, the wine was a charming little number from the South of France, a blend of… some… kind… of grapes.  It had a woodcock on the label, and the old European gentleman I purchased it from assured me without hesitation that this was the wine for pheasant.  (I mean, come one, there was a game bird right on the bottle!  Who was I to argue?)  Turns out he was so very right; it was a perfect match.

Hope you all had a fabulous Thanksgiving!


The Endive Problem: An Exposé

In my line of work as a personal chef, I’ve had many occasions to plan menus for dinner parties.  Often, in searching for ideas for appetizers or hors d’oeuvres, I’ve come across something that looks a lot like this:

The ingredients vary, of course, but the basic format is always the same.  A single leaf of endive is topped with a glamorous dab of something-or-other, always placed at the base of the leaf.  The toppings can be as simple or as elaborate as you like.  One version simply called for a crumble of blue cheese, a walnut, and a drizzle of honey; another used lobster meat with avocado slivers and segmented grapefruit.  Pictured here is a mixture of goat cheese, crème fraîche, lemon zest, and olive oil, topped with smoked trout and chives.

Every time I see one of these recipes, I am momentarily swayed by the stunningly pretty bites.  The pale green endive, curling slender and seductive around the filling, promises an easy and elegant answer to all your entertaining needs.

But then, I remember all the myriad reasons why I will never, ever, ever, ever make one of these endive “boats” again.

This, Gentle Reader, is the carnage left from making a mere six canapés.  These are the leaves that I couldn’t use, the waste left over.  For six canapés.  This is what those other recipes and well-styled photographs will never admit.

See, a head of endive is a slightly deceptive thing.  The outer leaves are simply too big for an hors d’oeuvre, which by typical standards should never be more than a single bite.  The inner leaves are too small to look quite right when prepared in this manner.  So the long-suffering chef is left only with the leaves in the middle, of which there are precious few of a similar size.

And yes, if one doesn’t care all that much about keeping all canapés the same size, it’s certainly possible to use all the leaves.  But then you end up with some extremely giant bites, and some lilliputian bites.  Call me a snob, but that just plain looks silly.

two of these things are not like the others

Not to mention that endive is a rather bitter green.  Paired with other flavors, it’s lovely, but it’s a little much to just eat on its own.  If you use the largest outermost leaves, your guests very well might only eat the end with the topping on it, and then leave the lipstick-stained bitter ends lying about.

Further, endive will not naturally sit flat on its spine.  In order to achieve those picture-perfect platters, it’s necessary to shave off a tiny bit of the leaf from underneath, which is tedious and leaves you with a bunch of strange ellipsoid slivers lying about.

Two whole endives sacrificed their lives for six hors d’oeuvres, people.  We can do better by them.

If your heart is set on using endive for an appetizer (or if you’ve already bought some), just do away with the “boat” idea completely.  Forget it.  It’s a trap.  That way only leads to sadness.  And though raw endive makes a fantastic salad, the French have a much better idea: cook it.  Boil it, in fact.

It probably sounds like the least appealing thing in the world, but when boiled, endive loses its puckering bitterness, and a somehow nutty sweetness is coaxed from the leaves.  It’s not much to look at, but it tastes fantastic.  Ginette Mathiot, in her magnum opus I Know How to Cook, provides a recipe for endive purée that blends boiled endive with a quick béchamel sauce.  Flavorful and simple, it’s so French it might as well be smoking.

Best of all, it’s a simple trick to turn this thick purée into an elegant canapé.  Crustless white bread, lightly toasted and cut into triangles, makes a base for a dollop of the endive purée.  A flake of smoked trout sits happily on top, accented with a colorful chive.

It’s nearly the same ingredients as the aforementioned endive bites, and just as attractive, but much better to eat and much nicer all around.

no
yes

I’m not quite sure where all these endive boat recipes got started, but I’m reasonably sure it was from someone with too much time on his hands, too much endive in the fridge, or both.  Maybe it’s some grand Endive Cabal, an alliance between endive farmers, recipe writers, and stylists, meant to make the rest of us poor saps look (and feel) dumb.  As for me, I’m having no more of it, and I mean to convince you all as well.  The next time you see one of these “endive boat” recipes, don’t pay it any attention.  Just walk on by.  You can thank me later.


Canapés with Endive Purée, Smoked Trout, and Chives
Makes about 2 cups purée, enough for many canapés
Adapted in part from I Know How to Cook, by Ginette Mathiot

The yield of this recipe is variable, but depends on how large your slices of bread are, how much smoked trout you have, and how many of these you feel like making (though it could hardly be described as difficult).  You may end up with extra endive purée, which makes a fabulous sauce for pizza, especially with some slivered red onions and leftover smoked trout and chives on top.  Just sayin’.

4 heads Belgian endive (about 1 1/4 pounds)
1 1/2 tablespoons butter
3 tablespoons all-purpose flour
1 cup milk
1/4 teaspoon freshly-grated nutmeg, or to taste
White pepper and salt, to taste
Sliced white sandwich bread
Melted butter or olive oil, as needed for brushing
Smoked trout, skin removed, and flaked
Fresh chives, snipped into 1 inch lengths

1. Preheat the broiler.  Bring a medium pan of water to a boil over high heat.  While heating water, cut endives into quarters lengthwise.  Salt the boiling water liberally, and add the endives.  Boil, uncovered, for 15 minutes.

2. While endives cook, make a béchamel sauce by melting the butter in a small saucepan over medium heat.  When the foam subsides, whisk in the flour until thoroughly combined with the butter.  Continue cooking and whisking until a slight nutty aroma develops, 2 to 3 minutes; do not let the mixture brown.  Add the milk slowly, whisking to prevent lumps.  Cook for 5 to 10 minutes, or until the béchamel is well thickened.  Season to taste with the nutmeg, white pepper, and salt.  Remove from heat.

3. After cooking the endive, drain well.  Let cool briefly.  When cool enough to handle, squeeze as much liquid as possible from the leaves, and transfer to a food processor.

4.  Purée the boiled endive with the béchamel until smooth.  Taste, and correct seasoning as needed with salt, white pepper, and nutmeg.  Let cool.  The purée should thicken a bit more as it cools.

5.  While purée is cooling, prepare the bread.  Brush each slice lightly with melted butter or olive oil.  Toast under the hot broiler until just golden brown.  Remove the crusts from the slices of bread, cut each slice into four triangles, and set aside.  (At this point, check the consistency of the purée.  It should be quite thick, and not at all runny.  If it’s too thin, you can toss in some of the toasted bread crusts and process until well blended.  Repeat as necessary.)

6.  To finish canapés, top each bread triangle with a small dollop of the endive purée.  Place a flake or two of smoked trout on top, and decorate with a piece of chive.  Plate and serve immediately.

pizza with leftover endive purée, shaved red onion, leftover smoked trout, and chives


A Very Ruth Bourdain Valentine’s Day

I have a crush.

I have a serious crush on Ruth Bourdain.

There, I’ve said it, and I don’t care who knows.

And today being Valentine’s Day, I’ve done what any sensible person would do: I’ve prepared a four-course dinner for my Special Lady, complete with drink pairings, and comprised of all her favorite foods.  I’ve dimmed the lights, and put on gentle music.  I got roses.

For the first course, only roasted marrow bones will do.  Accompanying are lightly-toasted baguette slices, and a vibrant breadcrumb topping with celery, scallion, parsley, and cayenne.  There are eight bones, because I want to make sure Ruth has enough to be satisfied.  Hell hath no fury like a woman with too little bone marrow.  A jammy, tannin-heavy Australian Shiraz is a fantastic match for the unctuous stuff, and gets the evening off to a properly-buzzed start.

The second course, a soup course, features honeycomb tripe in a flavorful broth, with tomatoes, onions, and celery.  Slowly simmered for hours, the frilly tripe softens into a lush tenderness, proving that even the most leathery flesh can be made supple with the right treatment.  The wine, a Chenin Blanc/Gewurtztraminer/Chardonnay blend from California, with its whip-crisp and flinty tone, lets her know that I’m not all warm fuzzies and sweet poetry.

As much as I would like, I can’t literally give Ruth my heart; but perhaps a veal heart will suffice instead.  The entrée, slices of braised veal heart stuffed with mushrooms, onions, bacon, breadcrumbs, and parsley, features a gratuitous pile of carrots alongside.  I don’t believe she’ll eat them, but a little color is always nice on the plate.  We devour with our eyes first, of course.  For such a special evening, I must open the bottle of Cabernet Sauvignon Reserve to pair with this course.  It’s only from 2005, but usually I can’t keep any wine around for longer than about a week; I found this one in the back of the cellar, hidden behind the Two Buck Chuck.

And finally, the pièce de résistance created especially for my Little Sweetbread: a smoked tangerine panna cotta.  I smoked cream, steeped it with tangerine zest, star anise, and cinnamon, and set it softly into a cool custard.  Tangerine suprêmes brighten the plate, and a simple almond florentine lends a crunching contrast to the yielding smooth flesh of the panna cotta.  Cocktails are in order at this time of night, and I present a ruby-red rye, Campari, Herbsaint, and sweet vermouth mixture called a New Pal.  The bracingly well-balanced drink is simple to whip up, and it’s a good thing, because I’m ten sheets to the wind at this point.

So, humbly, I present myself and this simple meal, in hopes that I might catch her eye, in hopes that she might notice me.  I don’t presume that she will deign to answer, but even a word from her savory lips, or a note written by her meat-slick fingers would lift my hungry soul to the company of angels.  Then, oh then, we might feast blissfully together on buffalo Seraphim wings and whole roast Cherubim, and be happy together.

Ruth Bourdain, will you be my Valentine?

***********

MENU

Roasted marrow bones, breadcrumb topping, baguette
Australian Shiraz

Tripe soup
Californian Chenin Blanc, Gewurtztraminer, and Chardonnay blend

Braised stuffed veal heart, carrots
Californian Cabernet Sauvignon Reserve, 2005

Smoked tangerine panna cotta, almond florentine
New Pal

***********

Roasted Marrow Bones with Breadcrumb Topping
Makes about 1 1/4 cups breadcrumb topping

I don’t give an amount for the marrow bones here, as it is determined by the number of guests being served, and the rest of the menu.  Four people will handily finish off the marrow of eight three-inch bones, if the following courses are reasonably light (and if RuBo hasn’t been invited).  The breadcrumb topping makes more than enough for such an amount, and the leftovers (kept refrigerated) make a fantastic topping for pasta or fried eggs, if re-crisped briefly in a hot pan.

1 cup (about 2 ounces) panko, or fresh breadcrumbs
1 tablespoon olive oil, plus extra as needed
1 clove garlic
1/4 cup finely minced celery hearts
2 scallions (white and pale green parts only), finely minced
2 tablespoons finely chopped fresh parsley
1/2 teaspoon dried thyme
1/2 teaspoon whole coriander seeds, ground
1 large pinch cayenne pepper
Salt and black pepper, as needed
Marrow bones, cut into 3 to 4 inch lengths or split lengthwise by butcher
Baguette, thinly sliced

1. Preheat oven to 275º F.  Toss panko with 1 tablespoon olive oil, and spread on a rimmed baking sheet.  Bake for about 30 minutes, stirring every 10 minutes, or until well-browned and very crunchy.  Cool completely.  Increase oven temperature to 400º F.

2.  Meanwhile, roughly chop the garlic.  Sprinkle with a pinch of coarse salt, and smash into a paste by dragging the flat side of a knife across the garlic.  Transfer to a medium bowl.  Toss with the minced celery, scallions, parsley, thyme, coriander, and cayenne until thoroughly combined.  Set aside.

3.  Place marrow bones cut-side up in a shallow oven-safe dish just large enough to hold all bones and keep them level.  Roast at 400º F for about 20 minutes (less if your bones are split lengthwise), or until marrow bubbles and offers no resistance at all when pierced by a skewer or thin, sharp blade.  Remove from oven and let cool briefly.

4.  Meanwhile, lightly brush both sides of baguette slices with olive oil.  Place in a single layer on a baking sheet, and toast in the oven for 3 to 4 minutes, or until just barely toasted.

5.  When ready to serve, toss browned panko with the celery and herb mixture.  Taste, and correct seasoning with salt and black pepper as needed.  Do not do this too early, as the breadcrumbs may lose their crispness.

6.  To serve, run a thin blade around the edge of the marrow to release it, if needed.  Serve warm either in the bone, or released onto a plate, with the baguette slices and the breadcrumb topping.

Stay tuned, more recipes to come soon!

Apple Cider and Walnut Birthday Cake

Every year, I ask my boyfriend not if he wants an elaborate, ridiculous, complicated, over-the-top birthday cake, but what kind.

As I was trained as a pastry chef, the chance for me to flex my pâtissière muscles once a year is irresistible.  I dive into the research stage like a student studying for final exams, poring over books and trawling through websites in search of the perfect combination of flavors and textures.  I plan, brainstorming ingredients and scribbling cross-section views to determine proper layering.  I bake, sometimes for several days, but always with the utmost care and professionalism, as this is serious business.  We invite others to help devour the behemoth.

The first year we lived together, he requested simply that it be “so unusual that most people wouldn’t want to try it based on the description”.  Thus was born the chocolate, pear, walnut, and blue cheese cake.  Five layers of it.  Oh, yes.  (And, in fact, many people did not want to try it based on that description, leaving us to finish most of it.)

The year after that, the request was for stark contrast to the previous year, something that could be described as yellow cake with white icing, but with a gourmet twist.  This resulted in the Meyer lemon cake with white chocolate buttercream, polka-dotted on the side with lavender macarons.

The challenge for this year was a simple request: fall fruit.  Having already offered pear (albeit subtly), and hating to repeat myself, I settled on apple as the dominant flavor.  My fevered brain concocted a vision of apples, walnuts, browned butter, and rum, layers of soft cake alternating with the airy crunch of dacquoise (basically, meringue with nuts).

Funnily enough, I ended up not using one single apple in the cake, preferring to use trusted recipes that would behave predictably, and flavoring with apple cider wherever possible.

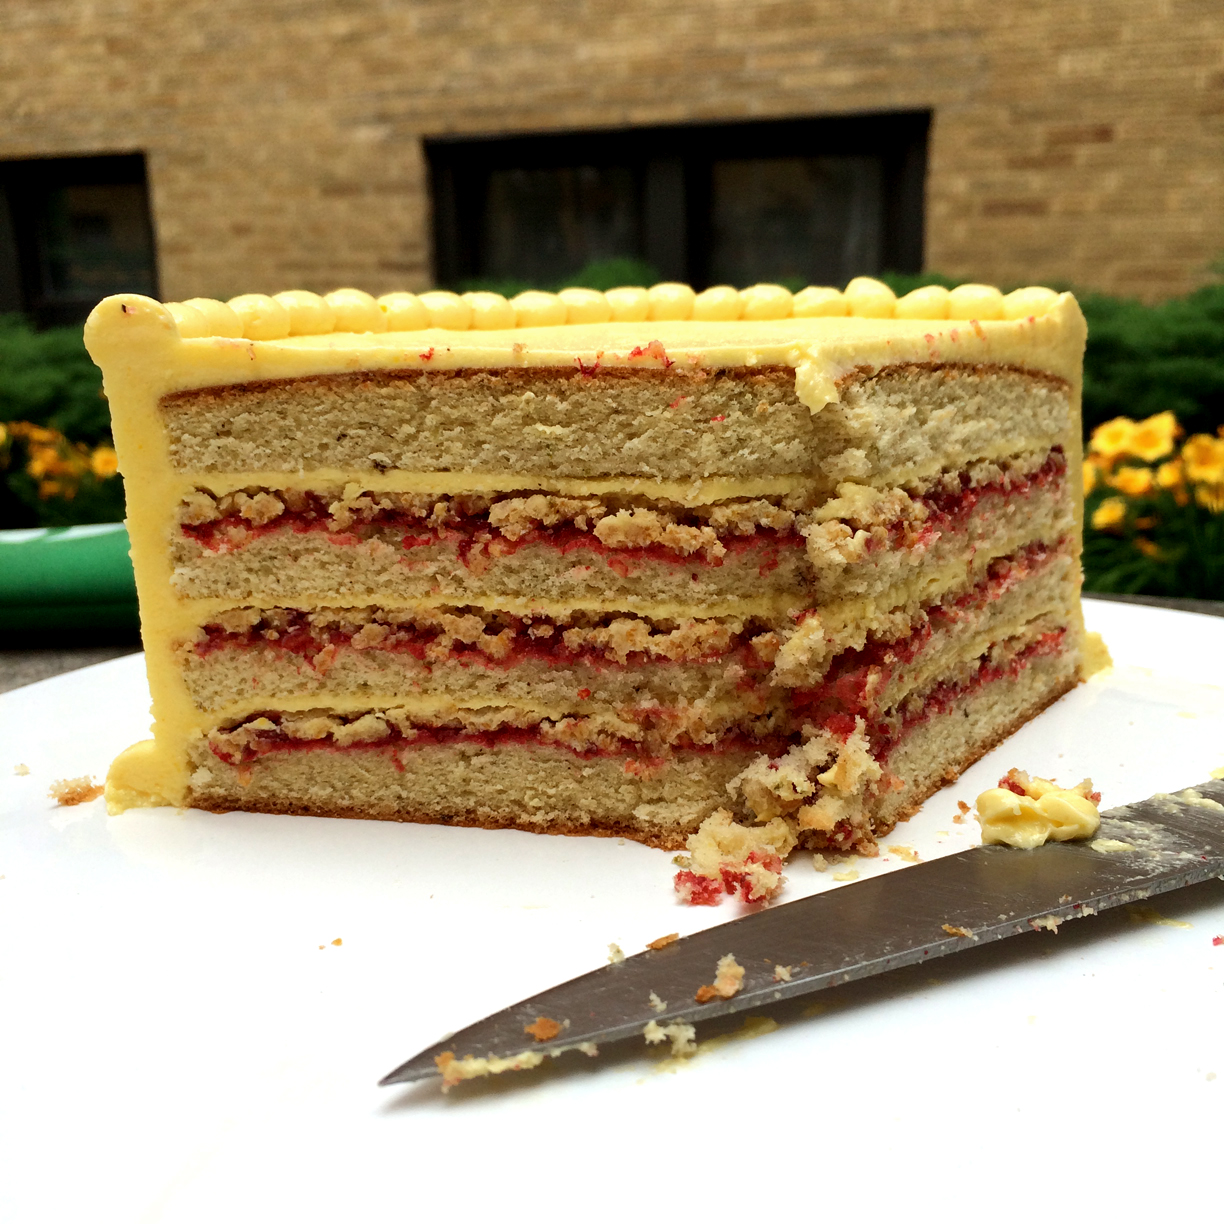
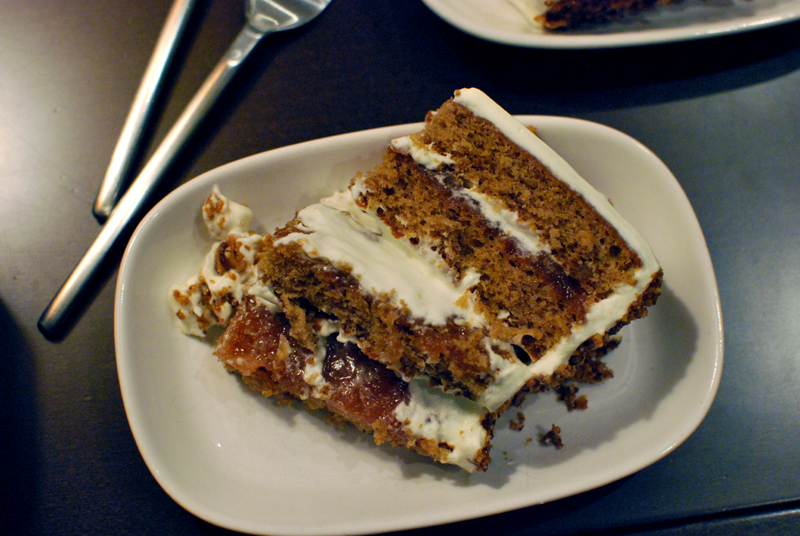
The finished cake was a seven-layer stunner, and tasted just as good as it looked.  Yes, it was quite sweet and rich (and the tall pieces necessitated laying the fork down for a breather halfway through), but the friable walnut dacquoise yielding between the teeth and the rum buttercream literally melting over the tongue were compulsion enough to finish the plate.  The cider flavor was subtle, but crisply present, playing very nicely with the browned butter cake layers.  The texture was the real star here, each bite equally soft, crunchy, and luxurious.

There was not one single piece left over at the end of the night.  I’d say that’s a pretty good review.

Apple Cider and Walnut Birthday Cake
Makes one huge cake

For the cake layers, I turned to Rose Levy Beranbaum’s French Génoise (recipe can be found here).  I doubled the recipe almost exactly, but used 120- 130 grams (about 9 tablespoons) of beurre noisette to really accentuate the browned butter flavor.  Additionally, instead of using only vanilla, I reduced a small pan of apple cider until it was nearly thick as honey, concentrating the apple flavor, and used that instead of half the vanilla.

2 9-inch French Génoise Cakes (recipe here)
Cider Cake Syrup (recipe below)
Rum Buttercream Frosting (recipe below)
Walnut Dacquoise (recipe below), edges trimmed to 9 inches to match the cakes

1.  Cut the tops off the cakes to make them level.  Carefully cut each into two layers.  Place the bottom layer of one cake on a cake plate, cut-side up.  Slide thin pieces of wax paper or parchment under the cake, to prevent frosting from getting on the plate.  Brush the cake with the syrup, gently and thoroughly, but taking care not to drench the cake (otherwise, the buttercream will be difficult to spread).

2.  Place a large dollop of buttercream on the cake layer, and spread to an even thickness of 1/8 to 1/4 inch.  Add additional if necessary, but take care not to get crumbs in the main bowl of buttercream.  Wipe the icing spatula as needed.

3.  Place a round of dacquoise on top, and press very lightly into the buttercream.  Spread another layer of buttercream on top of the dacquoise, taking care to not break the dacquoise.

4.  Repeat layering of cake (using the top halves of each cake, brushing each layer with syrup), buttercream, and dacquoise, until only one cake layer remains.  For the last cake layer (the bottom of the other cake), brush the cut (top) side with syrup before placing cut-side down on top of the cake (the brown bottom should be on the very top).

5.  Place a huge dollop of buttercream on the top of the cake.  Spread evenly across the top in a very thin layer, and let the excess fall over the sides, spreading evenly as it does.  Smooth extra buttercream over the sides in a very thin layer.  Do not worry about visible crumbs (which may be many) in this layer.  When the cake is fully coated with a very thin, even layer of buttercream, transfer to the refrigerator.  Let chill approximately 30 minutes, or until buttercream is firm.

6.  To finish frosting the cake, spread another thin layer of room-temperature buttercream over the top to hide the visible crumbs in the first layer.  Either spread buttercream over the sides, or pipe decorative vertical lines (start at the bottom) around the cake as shown.  Return to the refrigerator until ready to serve.  The wax paper or parchment strips will be easiest and cleanest to remove if the cake is well-chilled.  If well-chilled, let sit at room temperature for 30 minutes before serving.

Cider Cake Syrup
Makes about 1/2 cup

A light syrup such as this is one trade secret to achieving a moist, yet close-crumbed cake, ideal for thin cake layers.

2 1/2 ounces (70 g) water, about 5 tablespoons
2 1/2 ounces (70 g) apple cider, about 5 tablespoons
2-3 tablespoons sugar, or to taste

1.  Stir together over medium heat until the sugar dissolves.  Let cool before using.

Walnut Dacquoise
Adapted from The Professional Pastry Chef, by Bo Friberg
Makes four 9 inch rounds, plus a few extra meringue cookies

For this cake, you only need 3 dacquoise rounds, but one will invariably break.

6 ounces (170 g) raw walnuts, about 1 1/2 cups
1 ounce (30 g) cornstarch, about 1/4 cup
1 cup egg whites, at room temperature
14 ounces (400 g) granulated sugar, about 2 cups

1.  Preheat the oven to 250º F, using convection heat if possible.  Spread the walnuts in an even layer on a baking sheet, and toast for 10 minutes.  Let cool.  Position racks near the top and bottom thirds of the oven.

2.  Meanwhile, draw four 9 inch circles on sheets of parchment (the cake pan you will use to bake the cake layers is a perfect template), and mark the center of each circle.  Invert the parchment onto baking sheets, so that the pencil or ink side is down.  Make sure you can see the circles through the parchment.

3.  Chop the cooled walnuts, preferably in a food processor, until very finely ground.  Take care not to over-process them, and make a paste.  Toss with the cornstarch.

4.  Using a stand mixer, beat the egg whites with the whip attachment on high speed until thickly foamy, or approximately quadrupled in volume.  Continue to whip while very slowly adding the sugar, taking about 4 minutes to add it all.  Whip until stiff peaks form.

5.  With a large rubber spatula, lightly but thoroughly fold the walnuts into the whipped egg whites by hand.  Transfer the dacquoise into a piping bag fitted with a 1/2 inch (number 5) round tip.  Fill the bag only slightly more than halfway for an easier time piping.

6.  To pipe the dacquoise rounds, start in the marked center of each circle.  Holding the piping bag vertically, and using even pressure, let the dacquoise fall from the tip into a flat, tight spiral on the parchment, leaving no gaps in the spiral.  Try to pipe each spiral in one continuous ribbon.  Repeat with remaining dacquoise and circles.  Pipe any leftover dacquoise into small cookies around the edges of the piped spirals (do not let them touch).  (Alternatively, if you don’t have a piping bag, gently spread the dacquoise out into as even a layer as possible, using the circles as templates.  Use a spoon to make cookies out of any leftover dacquoise.)

7.  Bake the dacquoise at 250º F for one hour, or until thoroughly dry.  If after one hour, you are unsure whether or not it’s dry, simply turn the oven off and leave the dacquoise in the oven with the door closed for one more hour, or up to overnight.  If not using immediately, store in an airtight container until ready to use.

8.  When ready to use, trim the edges of the dacquoise with a serrated knife, to make the rounds exactly as big as the cake layers you are using.

Rum Buttercream Frosting
Adapted from The Professional Pastry Chef, by Bo Friberg
Makes 4 1/2 pounds, or enough for one 7 layer cake, or more than anyone reasonable should ever have on hand

This recipe, a classical French Buttercream, really requires the use of a thermometer for the sugar syrup.  It seems perhaps unnecessarily complicated, but produces a much more stable buttercream than a simpler method.  Do not be tempted to estimate temperatures here, as accuracy is fairly crucial.  Be sure your butter is well-softened before beginning; it will make your life so much easier.  And you are reading that correctly, you need two whole pounds of butter.  They don’t call it “buttercream” for nothing.

1 1/2 pounds (680 g) granulated sugar, a scant 3 1/2 cups
1/2 cup water
12 egg yolks, at room temperature
2 pounds (910 g) unsalted butter, at room temperature
2 to 3 tablespoons dark rum, to taste

1. In a medium saucepan, bring the sugar and water to a boil over medium-high heat, stirring just until the sugar is dissolved.  Without stirring further, cook the syrup until it reaches 240º F (sugar crystallization is the enemy here, and stirring will help form crystals).  Use a pastry brush dipped in water to wash any forming crystals off the side of the pan.

2.  Meanwhile, beat the egg yolks in a stand mixer on medium-high speed with the whisk attachment until fluffy and lightened in color, 3 minutes or so.  When the sugar syrup is fully cooked, lower the speed to medium-low.  Slowly drizzle the syrup down the side of the bowl into the yolks, avoiding the moving whisk as much as possible (which will fling syrup against the bowl, creating hard lumps that may later end up marring the smooth texture of the frosting).

3.  When all the syrup is added (do not scrape the pan; it’s okay if some remains), turn the speed to high and whip until the mixture has cooled.  This will take some time, maybe even 10 to 15 minutes.

4.  When the mixture has cooled enough to not melt the butter, turn the speed back to medium-low.  Add the butter gradually, only adding it in as fast as it can be incorporated.  The mixture will look curdled and broken at times, but do not despair.  Continue whipping, and all will be made well in the end.  When all (yes, all) the butter has been added, add the rum gradually, until it tastes right to you.  Use immediately, or refrigerate, bringing to room temperature before using.