I Believe This Might Just Be My Masterpiece: Birthday Cake 2014

Brown Butter & Lime Cake, with Strawberry Jam, Cornflake Crunch, and Corn Buttercream

Who makes the best cakes?  Momofuku Milk Bar makes the best cakes.  I am not being paid or otherwise compensated to say this.  It’s just the damn truth.

Here’s the logic: the best food texture is, obviously, crunchy.  Obviously.

What makes a good salad better?  Crunchy croutons (or crunchy bits of bacon).

Want your mac and cheese to go to 11?  Put a parmesan-breadcrumb topping on it.  Crunchy.

Best fried eggs ever?  Fry them on some panko.  You have unlocked achievement: crunchy.

What do you put on yogurt?  Granola.  Because crunchy.

What is lacking in 99.999% of cakes?  You daaamn right: crunchy.

pretty cake

I’m not a bakery connoisseur, but as far as I know, Christina Tosi is the only baker out there putting substantial crunchy in her cakes.  I’m talking serious crunch here.  Buckets of crunch.  Toasted nuts do not count, they are weak.  Other than the occasional dacquoise, which involves layers of dried meringue (and who makes those?), I’m not really aware of any.  Am I missing anything?

Crunchy layers will take a good cake to a friggin’ amazing cake.  Since I got my grubby hands on the Milk Bar cookbook, I haven’t made a layer cake without some sort of crunchy “crumb” layer.  You can never go back.

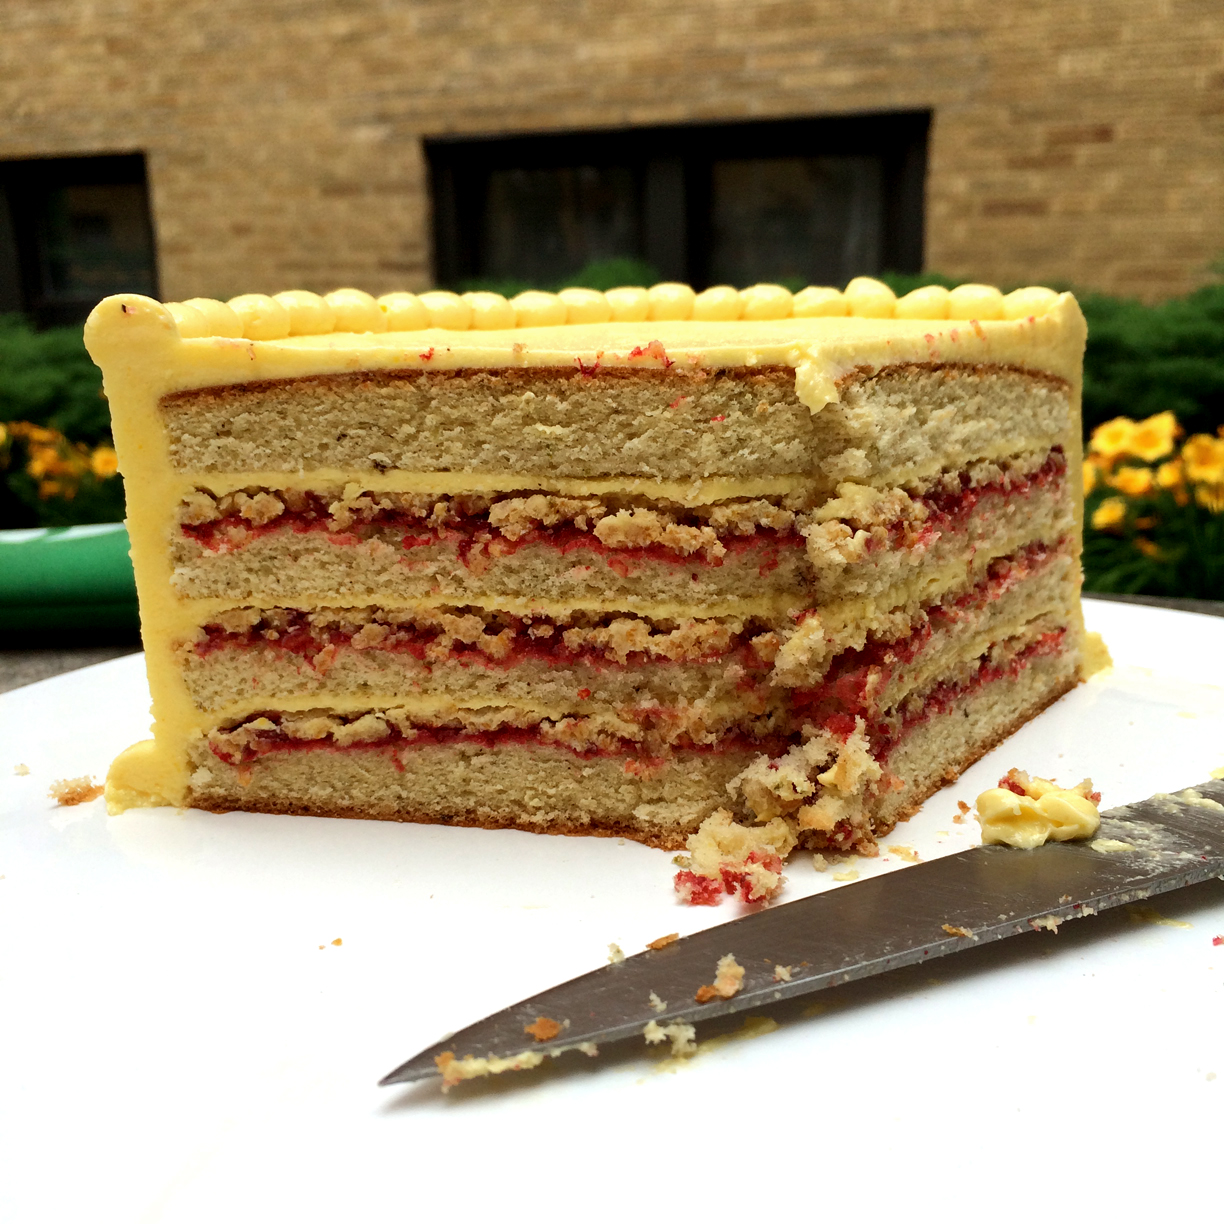
This year for my birthday, in imitation of Tosi, I made myself a Brown Butter & Lime Cake, with Strawberry Jam, Cornflake Crunch, and Corn Buttercream.

And hoo boy.

Hooooooo boy.

This cake… this cake was special.  It did not last long.

This is my new favorite cake trick: flavored buttercream.  And it’s stupid easy!  Figure out what flavor you want.  Buy some freeze dried whatever-that-flavor-is.  Me, I used corn.  Grind some to a fine powder in a spice/coffee grinder, and add it to your favorite buttercream.  Wham!  Corn Buttercream.

You’re welcome.

Brown Butter & Lime Cake, with Strawberry Jam, Cornflake Crunch, and Corn Buttercream

Yield: 1 friggin amazing cake

Brown Butter & Lime Cake, with Strawberry Jam, Cornflake Crunch, and Corn Buttercream

All right, let's do this thing.

The cake was Rose Levy Beranbaum's French Génoise. I made the Rich Variant, doubled the recipe to make 2 cakes, and rubbed the zest of 1 lime into the sugar until it looked like wet sand and smelled incredible. In the syrup, I used Bourbon.

For the strawberry jam, I sliced up a shy quart of farmers market strawberries, put 'em in a pan with a sprinkling of sugar (maybe a couple of tablespoons), and a hefty squeeze of lemon. I measured nothing. It cooked on medium-low until thick and jammy, which took it at least 30 minutes, probably more. And buddy, it was intense.

The cornflake crunch was based on Chef Tosi's Corn Crumbs, but I swapped cornflakes for the indicated Cap'n Crunch.  It didn't really work as expected.  It needed waaay more white chocolate at the end to make it come together.  It did the job, though.

The buttercream was based on the same recipe as this one, sans rum. I made only a half recipe this time, and it was the perfect amount for a 10" four-layer cake. I added 60 grams of finely ground freeze-dried corn to the finished buttercream.

Ingredients

  • (links to recipes in the headnotes)
  • Brown Butter and Lime Cake
  • Bourbon Syrup
  • Strawberry Jam
  • Cornflake Crunch
  • Corn Buttercream

Instructions

1. Slice the cakes in half horizontally, and trim any domed tops until things are nice and flat. Place the bottom of one cake on a cake plate or serving platter. (Reserve the other bottom for the top of the cake.) Slide four strips of wax paper under each side of the cake to protect the platter from over-frosting.

2. Brush the cake with the Bourbon Syrup until well-moistened.

3. Spread one third of the Strawberry Jam in a thin layer all the way to the edge.

4. Crumble an even layer of Cornflake Crunch over the jam, and press until mostly even.

5. Spread a dollop of Corn Buttercream evenly over the top of the Crunch layer, as evenly as possible.

6. Place another layer of cake on top of the frosting, and gently press into place.

7. Repeat the layering process. Brush the cut side of the last cake layer with syrup before stacking it syrup-side-down onto the cake.

8. Place a very large dollop of frosting on the top of the cake. Smooth it across the top and down the sides of the cake in a thin, even layer. Don't worry about crumbs at this point, just make it look even. This is called a "crumb coat". Use additional frosting as needed, but make this coat a thin one. Don't get crumbs in the bowl of remaining frosting.

9. Once the crumb coat is finished, chill the cake and any unused frosting for at least 1 hour.

10. When the crumb coat is firm and well chilled, repeat the frosting procedure with the remaining frosting. No crumbs should be showing.

11. Decorate however you want to, with piped frosting, leftover Cornflake Crunch, or whatever.

12. Chill the cake at least 1 hour, or until frosting is firm and well chilled. Now remove the wax paper from under the cake. Admire how clean your platter looks.

13. Serve at a party with candles and friends to sing "Happy Birthday". Champagne, Bourbon, you know the drill.

https://onehundredeggs.com/i-believe-this-might-just-be-my-masterpiece-birthday-cake-2014/

Corn Cookies, à la Momofuku Milk Bar

On our recent trip to New York City, we stopped in at Momofuku Milk Bar.  Christina Tosi, head Pastry Chef of David Chang’s Momofuku empire, has lately become a darling of the food world.  With my training in Baking and Pastry Arts, I mostly wanted to see what all the fuss was about.

love this logo

I’ve already said my piece on the black sesame croissant we got (the short version: it’s awesome), but we also picked up the five cookie flavors they offered that day: Compost(TM)(srsly), chocolate-chocolate, cornflake-marshmallow, blueberry & cream, and corn.  As you can see, some of them didn’t last until the photo shoot.

left to right: compost(tm), chocolate-chocolate, cornflake-marshmallow

Overall, these are good cookies.  They have many qualities of acceptable bakery cookies: big as a small plate, sweet, interesting flavor bits, texture somewhere between chewy and soft.  The chocolate-chocolate was the best of these three, with a sophisticated flavor redolent of Oreo, which I assume must be due to black cocoa.  But if I’m honest, I didn’t get anything terribly special from the lauded Compost(TM) and blueberry & cream flavors.  Yes, the Compost(TM) has interesting salty bits, and the blueberry has… blueberries; but they’re not really enough for me to travel across town for, let alone get on a plane to NYC.

compost(tm) cookie; reminded me of a gussied-up potato chip cookie my mom used to make

Maybe the problem is with me, though.  Despite my scholastic specialization, I don’t have much of a sweet tooth.  I’d much rather eat something salty and savory over a cookie any day.  So for a cookie to impress me, it has to be something pretty darn special.  It has to make me sit up, narrow my eyes, tilt my head ever so slightly, and maybe curse gently.  It pretty much has to be Plato’s Ideal Cookie.

This, Gentle Reader, is that cookie.

Well, it’s where that cookie used to be, anyway.  This is where the corn cookie used to be, the cookie that made me wish I had been responsible for its existence.  How could anything that is not-corn taste so much like corn?

I’ve never tried to reverse-engineer a baked good before, but this cookie demanded an attempt.  I had two clues at my disposal: one, the ingredients list (listed by weight, remember), and two, the knowledge that Chef Tosi uses high-quality ingredients with simple techniques.  She was likely going to use whatever was easily at her disposal, and not futz with things too much.  There would be no unnecessary complication, like, say, steeping churned-in-house butter with late-July corn cobs to infuse every possible mote with ultimate corn flavor.

cornmeal not ground finely enough yet

The one “mystery” ingredient, if it can be called that, was something listed as “corn powder (dyhydrated corn)” [sic].  I assumed that was a typo, and not corn with two types of water.  And as chance would have it, while procuring cinnamon from the amazing spice store that I am lucky to live near, I noticed a register-side basket of nothing less than freeze-dried corn.  Close enough.

look ma, no water

Back home, my research determined that this cookie dough was most likely a variant of the basic chocolate chip cookie, sans chips, of course.  I listed the ingredients and amounts from four trusted recipes, and developed a recipe based on those, swapping some of the flour for finely-ground corn meal and freeze-dried corn.

The dough came together beautifully, to my glee, and baked into a soft and ultra-yellow cookie that looked surprisingly similar to the real deal.  And the taste?  I couldn’t very well do a side by side comparison, but it wasn’t far off from what I remembered: slightly under-sweet, buttery, and with a truckload of corn flavor.

It’s possible to tweak the amounts slightly and maybe achieve a more accurate recipe, but I’m pretty thrilled with what resulted.  And unless someone is willing to sponsor me, I don’t really want to pay for the shipping involved in acquiring a new batch of “control” corn cookies for further analysis.

i has a corm cookie


EDIT: Based on this tweet that I just saw:

…I’m revising the recipe to include a mandatory fridge rest for the dough.  I don’t know that all of Chef Tosi’s cookie recipes would necessarily include a rest, but one apparently does.  I know it works miracles on most cookie dough, and I’ve always done it for this recipe with great success.  And it’s my blog.  So there.

Corn Cookies
Inspired blatantly from Christina Tosi’s Corn Cookies at Momofuku Milk Bar
Makes about 4 dozen two-inch cookies 

As with most cookie dough, this one may be frozen or refrigerated, and may actually give a better result if left to rest overnight in the refrigerator.  If you can’t get your hands on corn flour, just use a good-quality cornmeal (preferably stone-ground, but whatever) and grind it to a very fine powder in a spice grinder.  Don’t be tempted to use unadulterated cornmeal; it will give your cookies a gritty texture.  No pun intended.

While I found the freeze-dried corn at my amazing local spice shop (they ship!), I know that natural-food groceries (like Whole Foods) often carry a brand of dehydrated vegetables that makes dried corn.  They might have it in stock, or be able to order it for you.

Also, I specify a European-style butter, which has a higher fat percentage than American butter, making for a softer cookie.  I don’t know what sort of butter Milk Bar uses, but I know their dairy is high-quality and sourced from a local farm, so I figured I’d use the good stuff.  The recipe should work just fine with whatever butter you have, though.

Yes, I’m listing everything by weight.  Grams, to boot.  I don’t know how to translate “120 grams of freeze-dried corn” into cups; I’m sorry.  But if you bake regularly, and you don’t have a scale, you should really, really, really invest the $15-20.  It’s much more precise, and your baked goods will turn out more consistently.

175 grams unbleached all-purpose flour
120 grams freeze-dried corn, ground to a fine powder in a spice grinder
55 grams corn flour (see headnote)
1 teaspoon salt
1/2 teaspoon baking powder
1/4 teaspoon baking soda
350 grams granulated sugar
225 grams (8 ounces) European-style unsalted butter (such as Plugrá), at room temperature
100 grams (2 large) eggs

1.  Preheat the oven to 350º F.  Whisk together the all-purpose flour, ground up freeze-dried corn, corn flour, salt, baking powder, and baking soda; set it aside.

2.  In the bowl of a stand mixer (or by hand, if you’re into that), cream together the sugar and butter until just combined, scraping the bowl as needed.  You should only need to mix for about a minute, maybe less.  Please do not beat the living daylights out of it; your cookies will spread too much if you do.

3.  Add the eggs one at a time, beating to incorporate after each addition.  Add the dry ingredients and mix just until a soft dough forms.  Gently scrape the dough into an airtight container (a plastic container, zip-top bag, or just wrap the lot in plastic wrap); no need to shape pretty logs, though that’s certainly an option if you like.  Refrigerate for at least 1 hour, and up to 2-3 days.  Alternatively, portion the dough out into individual cookie lumps, place on a single sheet pan (it’s okay if they touch), wrap in plastic wrap, and freeze until solid before storing in a gallon freezer zip-top bag.

4.  If refrigerated, leave dough at room temperature for 30-60 minutes before proceeding.  If frozen in portioned out lumps, proceed without thawing, but add a couple of extra minutes to the baking time.  Scoop heaping tablespoons of dough onto parchment-lined or ungreased sheet pans, leaving about 2 inches between each.  Bake at 350º F for 10-12 minutes, or until the undersides and the occasional outside edge turn golden brown.  Don’t let the tops brown; the cookies should remain bright yellow with no (or very little) browning.  Let cookies cool briefly on the pans before transferring to racks to cool thoroughly.

NYC Part I: Momofuku Milk Bar

Two weekends ago, I spent the most incredible time in New York City with some dear, dear friends.  It was my third visit to the city, but my first in about eight years, and certainly my first since I’ve cared much about food at all.  And, oh.  My.  Goodness.  The food.

The food, the food, the food.

And maybe a drink or two, here and there.

But, oh! the food.  There was a not insubstantial amount of food, and we ate all of it.  I’m afraid there is no more food in New York, because we ate it all.

We jetted off without a food itinerary, aside from one night, which might cause some type-A’s out there to lose a monocle or do a spit-take.  But I prefer to travel that way; let chance, circumstance, and mood dictate the days, and things generally work out beautifully.

My only requirement was to stop at Momofuku at some point.  No, I didn’t care which one.  Any one would do, with weighted preference to Milk Bar and their take-away-friendly baked goods.  Eventually, my (loudly) dropped hints took effect, and we made our way to the Midtown location – which just so happens to share a front door with Má Pêche, where we had a fantastic lunch.  (Or was it breakfast?  What do you call it when the first meal of the day is at 2 pm, and involves beer?)

We left with a taste of Milk Bar’s Cereal Milk(TM)(seriously) soft-serve and a bag of goodies, comprised of 6 cookies (more on those later) and one black sesame croissant.  My holy grail, their kimchi and blue cheese croissant, was disappointingly absent from the case, but the black sesame version went a long way towards assuaging my grief.

I’ve never seen a croissant so swarthy.  Inside, the nearly-foot-long behemoth swaddled a filling of strawberry jam and a sweetened cream cheese that one of us suggested might be Cereal Milk(TM) cream cheese.  The tender and flaky layers of pastry seemed to be dotted with black sesame seeds ground to a powder or paste, which helps explain the off-black crust.  It is also a thoroughly brilliant idea that I might have to try the next time I make croissants.

Apart from being a day old by the time we broke into the croissant (and slightly dried out, but surprisingly very little), I’d classify it as one of the best croissants I’ve ever had.  Certainly, it’s the most creative.  The filling was just restrained enough with sweetness, which pleased me, knowing Chef Tosi’s reputation as a sugar-lover extraordinaire.

And the fact that I missed out on the kimchi croissant just gives me an excuse to go back.  Just as soon as my wallet recovers.

Stay tuned for more NYC adventures, as soon as I can catch my breath and post more.